A Windows rendszer indításakor a 0xc000000e hiba azt jelenti, hogy sérült indítási konfigurációs adatokkal foglalkozik. A Rendszerindítási konfigurációs adatok globális tárhely az új Windows PC-ken történő indítással kapcsolatos összes lehetőség és beállítás számára.
Ezt a hibát akkor kapja meg, amikor megpróbálja elindítani a készüléket, és egy fekete képernyő jelenik meg, amely útmutatást nyújt a számítógép javításához telepítőlemez vagy helyreállítási meghajtó segítségével. Sajnos ennek a helyreállítási meghajtónak a birtokában lehet megoldani ezt a problémát, ezért a kezdés előtt érdemes kezébe venni. Ha még nincs, akkor a Rufus vagy a Windows Media Creation eszköz használatával bármely más számítógépről vagy egy laptopról meglehetősen egyszerű létrehozni .

Be kell indítania a BIOS-ba is, hogy megváltoztassa az indítási sorrendet, és a merevlemez helyett a helyreállítási meghajtóról indítsa el a számítógépet. Ehhez hajtsa végre a következő lépéseket:
- Adja meg a BIOS vagy az UEFI beállításait az alaplap gyártójának kijelölt gombjának megnyomásával, mielőtt a Windows elindulna. Ez a kulcs általában Esc, Delete, F2, F8, F10, F12 vagy Backspace, a gyártótól függően. Online keresést végezhet a BIOS-ba történő belépésről, majd a számítógép modelljéről.
- Odabent, keresd meg a boot használata található utasításokat a BIOS változtatni a boot sorrendben, és állítsa akár a CD-ROM-on vagy USB porton keresztül, hogy az első eszköz, attól függően, hogy a helyreállítási meghajtó egy CD vagy egy flash meghajtót .
- Mentse el a beállításokat, és lépjen ki.

1. módszer: A rendszerindítási konfigurációs adatok újjáépítése
Ehhez be kell indítania a számítógépet a helyreállítási meghajtóról. Ha a fenti lépésekkel konfigurálta a BIOS-t, akkor ezt bármelyik gomb megnyomásával megteheti, amint a prompt megjelenik a kijelzőn. Miután a számítógépet elindította a helyreállítási meghajtóról, a következő lépésekkel állítsa helyre a BCD-t:
- A Windows telepítő párbeszédpanelen állítson be mindent a megfelelő értékekre, válassza ki a nyelvet és kattintson
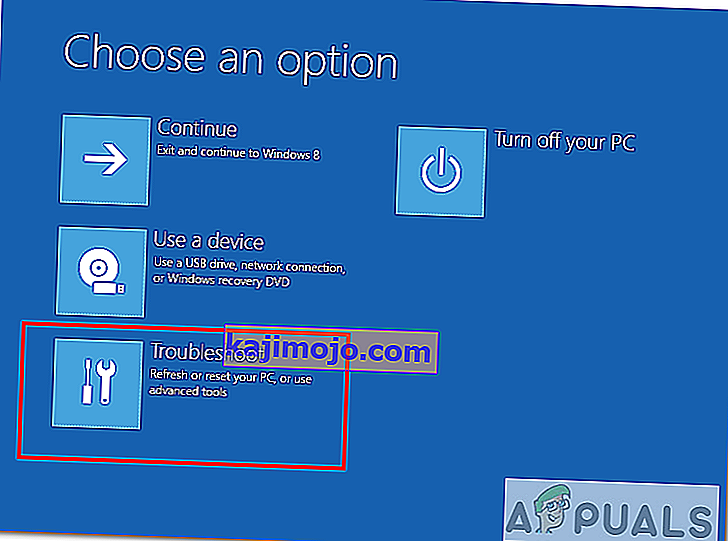
- A bal alsó sarokban kattintson a Számítógép javítása elemre , és válassza a Hibaelhárítás lehetőséget a Válasszon opciót képernyőn.
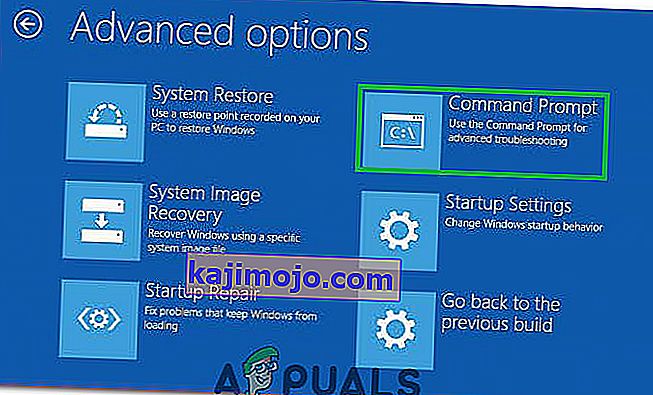
- A Hibaelhárítás képernyőn kattintson a Speciális beállítások elemre , majd kattintson a Parancssor elemre .
- Amikor megnyílik a Parancssor, írja be a következő parancsokat, mindegyik után nyomja meg az Enter billentyűt:
bootrec / scanos bootrec / fixmbr bootrec / fixboot bootrec / rebuildbcd
- Indítsa újra a számítógépet, és rendben be kell indulnia, anélkül, hogy újra szembe kellene néznie a problémával.

2. módszer: Javítsa meg operációs rendszerét a helyreállító meghajtóval
Ez a módszer javítja az operációs rendszert a helyreállító meghajtó parancssorával, és képesnek kell lennie a Windows rendszerre történő indításra anélkül, hogy újra szembe kellene néznie a problémával. Indítsa el a helyreállító meghajtóról, és kövesse az alábbi utasításokat.
- Az előző módszer 1-3. Lépéseivel eljuthat a helyreállítási meghajtó Parancssorához .
- Miután belépett a Parancssorba, írja be az alábbi parancsokat, majd a végrehajtásukhoz írja be az Enter billentyűt. A StartRep.exe segédprogram kijavítja a rendszerindítási környezet értékeit, és javítania kell a BCD hibát. Ne feledje, hogy előfordulhat, hogy ezt a lépést többször meg kell ismételnie, ha nem sikerül.
cd x: \ sources \ recovery StartRep.exe
- Ha a Windows javításának előző lépése nem segített, írja be a bcdedit parancsot a Parancssorba a Windows Boot Manager értékeinek megtekintéséhez.
- Vegye figyelembe az Eszköz értékeit . Ha ismeretlenek , írja be a következő parancsokat, amelyek végrehajtásához mindegyiket egy Enter követi . Szükség esetén cserélje ki a C: parancsot arra a partícióra, ahová az operációs rendszer telepítve van.
bcdedit / set {DEFAULT.EN_US} eszközpartíció = c: bcdedit / set {DEFAULT.EN_US} osdevice partíció = c: bcdedit / set {BOOTMGR.EN_US} eszközpartíció = c:- Ha a Parancssor elkészült, zárja be, távolítsa el a helyreállítási meghajtót, és indítsa újra a rendszert. Nem lehet, hogy bármilyen probléma lenne az indítással.
E megoldások egyetlen hátránya, hogy helyreállítási erőfeszítést, türelmet és erős idegeket igényelnek. Ha azonban követi őket, ahogy le vannak írva, akkor javítsa ki a kapott hibát, és folytassa az eszköz használatát, mint korábban.
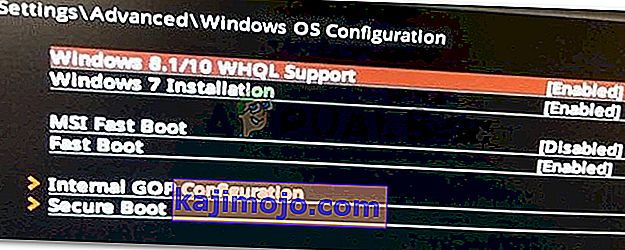
3. módszer: Engedélyezze a Windows 10 WHQL támogatását a BIOS-ban
A Windows 10 WHQL támogatási beállítása létezik néhány OEM-ben. Két alapvető funkciója van: ellenőrzi az aláírt illesztőprogramokat az indítási folyamat során, és lehetővé teszi az UEFI támogatás engedélyezését. Ha Windows 10 rendszert használ, engedélyeznie kell, és a számítógép rendesen elindulhat. Ha azonban nincs kiválasztva, akkor a számítógép a 0xc000000e hibába indulhat. Tehát elérheti a BIOS-t, hogy megnézze, engedélyezve van-e a Windows 10 WHQL támogatás beállítása. Ha nem, akkor engedélyezze, hogy megpróbálja.
Meg kell jegyeznie, hogy a Windows 10 WHQL támogatási beállításokat nem támogatja minden számítógép. Ha a számítógépén nincs, akkor ellenőrizheti, hogy az UEFI támogatás engedélyezve van-e a számítógépén. Ha nem, engedélyezheti, hogy eltűnik-e a 0xc000000e hibakód. Annak érdekében, hogy:
- Állítsa le teljesen a számítógépet, és hagyja legalább néhány percig ülni.
- Miután megbizonyosodott arról, hogy elegendő idő telt el, indítsa újra a számítógépet, és észre kell vennie a „ Nyomja meg ezt a gombot a Bios módba történő indításhoz ” opciót.
- Nyomja meg a gombot a Bios módba történő indításhoz.
- Miután sikeresen elindult a Bios módban, ellenőrizze, hogy van-e Windows WHQL beállítás a Bios-ban.
- Ha jelen van, nyomja meg az „Enter” gombot a kijelöléshez, miután kijelölte a nyílbillentyűkkel, majd válassza az „Engedélyezve” opciót a számítógépen való engedélyezéshez.
- Ellenőrizze , hogy ez megoldja-e a problémát.

Ha a Windows 10 0xc000000e rendszerindítási hiba továbbra is megjelenik a Windows 10 WHQL támogatási beállítás vagy az UEFI támogatás engedélyezése után, akkor lehet, hogy vissza kell állítania a számítógép BIOS / UEFI konfigurációját.
4. módszer: A BCD újjáépítése az Easy Recovery Essentials segítségével
Az Easy Recovery Essentials egy kattintással automatizált rendszerjavítási szolgáltatás, amely magában foglalja a BCD teljes javítását és rekonstrukcióját a „0xc000000e” hiba megoldására, még abban az esetben is, amikor a Windows nem indul el a hiba következtében.
Az EasyRE automatizált indításjavító összetevője megoldja az összes BCD-vel kapcsolatos problémát, kijavítja a BCD-t, vagy a semmiből újrateremti a helyes kódolást és a megfelelő betöltést elutasító partíció elérési útját. A lemezt online állapotban is megjelöli a megfelelő működés biztosítása érdekében.
Az Easy Recovery Essentials garantálja, hogy a beépített Automatikus javítás opcióval automatikusan kijavítja a „0xc000000e” hibát. Az EasyRE jelenleg elérhető Windows XP, Vista, 7, 8, 10 rendszerekhez, és bármely számítógépen letölthető és létrehozható.
- Szerezzen be egy másik számítógépet, amellyel létrehozhat egy USB-t, amelyet a számítógép indításához fogunk használni.
- Töltse le innen az Easy Recovery Essentials alkalmazást.

- Égesse le a képet.
- Indítsa el számítógépét az Ön által létrehozott Easy Recovery Essentials CD-ről vagy USB-ről.
- Once EasyRE is running, choose the “Automated Repair” option and click Continue.
- After EasyRE scans your computer’s drives, identify and select the drive letter for your Windows installation from the list, and then click on the Automated Repair Option to begin.
- Easy Recovery Essentials will start analyzing the selected drive for problems. EasyRE will test for and attempt to automatically correct errors with the disk, partition, bootsector, filesystem, bootloader, and registry. No intervention is required, as EasyRE’s repair is fully automated.
- Once the process is complete, EasyRE will report its findings. Click on the Restart button to reboot your PC and test the changes.

Method 5: Reset BIOS/UEFI Configuration
Some users said that their error 0xc000000e issue is solved by resetting the BIOS/UEFI configuration. So, you can consider trying this method to see whether this issue can be solved.
Step 1. Open BIOS Menu
To reset BIOS to default settings, you need to access the BIOS menu and find the Default Settings option first.
Windows 10 users can access advanced startup options Windows 10 and get into the BIOS menu. You can click Start -> Power, press and hold the Shift key, and click Restart button to reboot Windows into Windows Recovery Environment. Then click Troubleshoot -> Advanced Options -> UEFI Firmware Settings, and click Restart to enter into the BIOS settings screen.
Alternatively, you can also restart your computer normally and press the required key in the startup screen to boot into the BIOS settings window. The hotkey is varied from different computer manufacturers, and it could be F12, Del, Esc, F8, F2, etc.
Step 2. Find the Setup Defaults Option
The name and location of the “Setup Defaults” option may be different from various computers. It generally calls like: Load Default, Load Setup Defaults, Load Default Settings, Load BIOS Defaults, Load Optimal Defaults, etc.
Use the arrow keys on the computer keyboard to find the BIOS setup default option in the BIOS settings screen. You may find it in one of the BIOS tabs.
Step 3. Reset BIOS
After you find the Load Setup Defaults option, you can select it and press the Enter button to start resetting the BIOS to factory default settings in Windows 10.
At last, you can press F10 to save and exit BIOS. Your computer will automatically reboot. If you need to change BIOS settings again in the future, you can follow the same instructions to access BIOS again to change it.
Method 6: Mark Boot Disk As Online
It is possible in some cases, that the disk that you have connected to the computer or the USB that you are trying to boot from has been marked as offline by the computer. Some computers tend to prevent extra applications, hardware, and other things from being able to run as soon as the computer starts because it allows for more convenient and fast startup experience. Therefore, in this step, we will be marking the Disk as online.
You still need to use a bootable USB medium to do this job. We will show you a step-by-step guide here:
- After booting your computer from the bootable USB drive, you need to go to Next > Repair your computer. Then, you will enter WinRE.
- Go to Troubleshoot > Advanced options > Command Prompt.
- Make sure to properly enter your login credentials if you are asked by the computer.
- Type in the following command inside the command prompt to successfully launch the disk part utility on your computer.
diskpart
- Type in either one of the following commands in the next window to list the currently connected disk drives to your computer.
List Disk List Volume
- Once the disks have been listed, you need to identify the disk that contains the Windows operating system and the one that you want to mark as active.
- After identifying it, select the disk using the following command and replacing the alphabet with the driver letter of that disk.
select disk A Select Volume A (Replace A with the Drive Letter)
- After you have successfully selected the disk, you must mark the disk as online in order to initiate the recognization process of the disk at startup. Use the following commands to do that.
Online Disk Online Volume
- Type in the following command to successfully get out of the command prompt and restart your computer after that.
Exit
- Check to see if marking the Disk as online has fixed your issue.

Method 7: Check your data cables, BIOS and drivers
Unplug all HDD data cables, and then plug them again. Revert to the previous drivers and BIOS settings if they were changed, or use “Restore factory settings” option in the BIOS. Make sure to write down all current BIOS settings that were previously selected, just in case it is required to switch back. If the error is caused by a change of the SATA disk controller’s mode in the BIOS or firmware, the fix can be as simple as entering the BIOS and toggling the SATA controller’s “mode” setting. The exact instructions differ from one manufacturer to the other, but the options will resemble what is shown in the screenshots below.
To check the boot order, follow these steps:
- Restart the computer
- Press the necessary key to open the BIOS menu. This key depends on the computer manufacturer and computer model. This is usually listed on the first screen that appears on the monitor. It can be any of the following: Esc, Del, F2, F8, F10 or F12.
- If the screen shows multiple keys, find the key to open “BIOS”, “setup” or “BIOS menu”
- Attempt to toggle between all three (or more) modes until a combination that results in Windows booting successfully once more is found.
Method 8: Boot Windows In Safe Mode
If above solutions didn’t fix the problem, then Start Windows into safe mode. This will start your PC with minimum system requirements, will not load startup programs, add-ons etc. And allow performing troubleshooting steps to fix Boot Error 0xc000000e:
Before you enter the safe mode, you need to enter the Windows Recovery Environment (winRE). To do this, you will repeatedly turn your device OFF, then ON:
- Hold down the power button for 10 seconds to turn off your device.
- Press the power button again to turn on your device.
- On the first sign that Windows has started (for example, some devices show the manufacturer’s logo when restarting) hold down the power button for 10 seconds to turn off your device.
- Press the power button again to turn on your device.
- When Windows restarts, hold down the power button for 10 seconds to turn off your device.
- Press the power button again to turn on your device.
- Allow your device to fully restart and you should boot into the Windows Recovery Environment.
Now that you are in the Windows Recovery Environment, you will follow these steps to take you to safe mode:
- On the Choose an option, screen, select “Troubleshoot” and then “Advanced options.”

- Now click on “Startup Settings” and click on “Restart.”
- After your device restarts, you’ll see a list of options. Select option “4” from the list or press “F4” to enter Safe Mode.

Note: If you need to exit safe mode, simply restart your device, or:
- Press the “Windows logo key + R.”
- Type “msconfig” in the Run box and then select “OK”.

- Select the Boot tab and under Boot options, clear the Safe boot checkbox.

Method 9: Check your disk with CHKDSK utility
If the hard drive has its file integrity compromised, it is possible to use built-in Windows CHKDSK utility to scan the disk and fix the file system errors.
- Connect a USB drive that has been made bootable or insert the Windows Installation Disk on your computer.
- After connecting one of these, boot from that connected device.
- After booting your computer from the device, click on “Next” and then on the “Repair your Computer” option.
- On the next window, click on “Troubleshoot” and then on the “Advanced” Option.

- On the next screen, make sure to select the “CommandPrompt” option to successfully launch into the command prompt.
- Provide the login credentials of your account in order to boot inside the cmd.
- Inside the command prompt, type in the following command to successfully run the check disk utility on your computer.
chkdsk C: /f (Make sure to replace the "C" with the Drive letter of your partition).
- Confirm any on-screen prompts and wait for the scan to be fully completed.
- Check to see if the issue is fixed by performing this step.
Method 10: Disable fast startup Feature
If your computer has been set up to use the Fast Startup feature, you might be getting this error message on your screen because of doing so. The Fast Startup feature is known to malfunction with some operating systems and hardware combinations.
Basically, when enabled, the feature automatically sends some launch configurations to be stored in your RAM to allow for a faster startup as indicated by its name but this configuration data can sometimes be corrupted which can lead to this error on your computer. Therefore, in this step, we will be disabling it completely. For that:
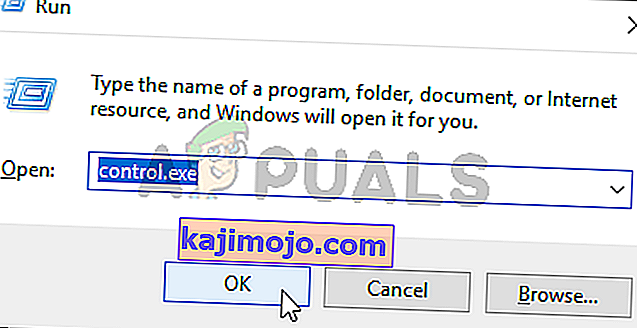
- Press “Windows” + “R” to open the Run prompt.
- Type in “Control Panel” and press “enter” to launch the classical Control Panel interface.
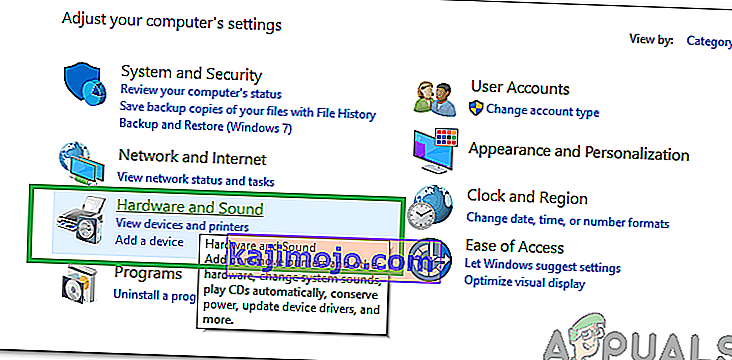
- Inside the control panel, click on the “Hardware and Sound” option and then select the “Power Options” button.
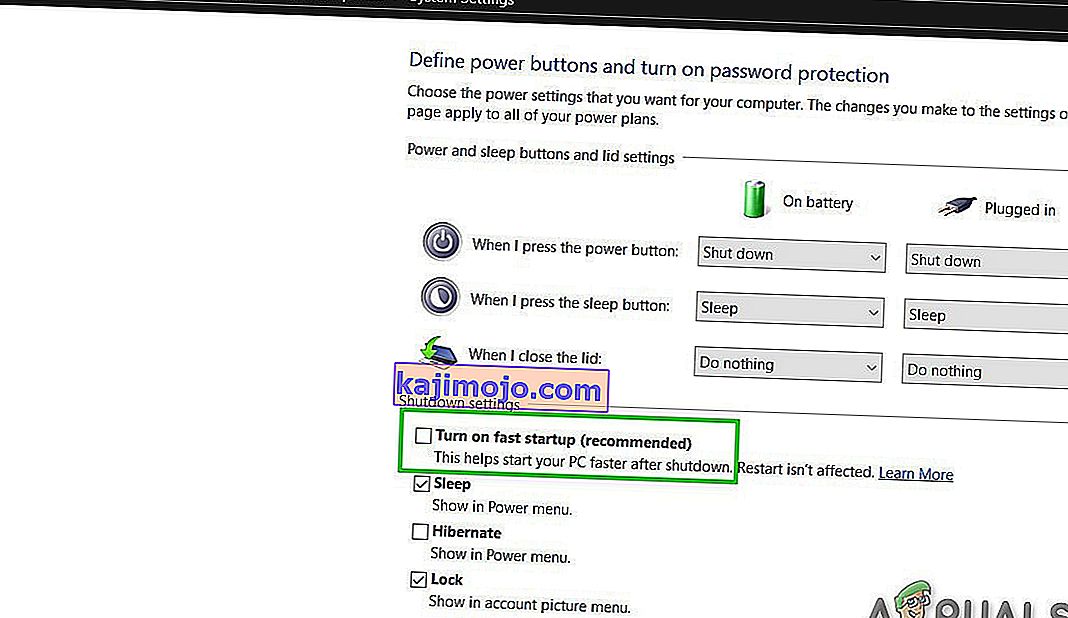
- Inside the power options, click on the “Choose what the power button does” from the left side.
- Click on the “Change Settings” option if the fast startup option is greyed out.
- Make sure to uncheck the “Turn on Fast Startup” option and save your changes.
- Closeout of the window and terminate any unnecessary applications.
- Click on the “Start Menu”, click on the “Power Options” and select “Shutdown” from the list.
- This option should completely power down your computer and after performing a complete shutdown, wait for some minutes before turning your computer back on.
- After the computer turns back on, check to see if the error message is fixed.
Note: This solution can only be applied if you are able to sometimes boot up your computer normally and are only encountering this error momentarily.


Method 11: Repair Corrupted System Files
It also possible in some situations that certain system files might have been corrupted due to a storage failure or due to some other reason. Therefore, in this step, we will be performing a complete repair of the corrupted system files and then we will check to see if doing so fixes this issue. For that:
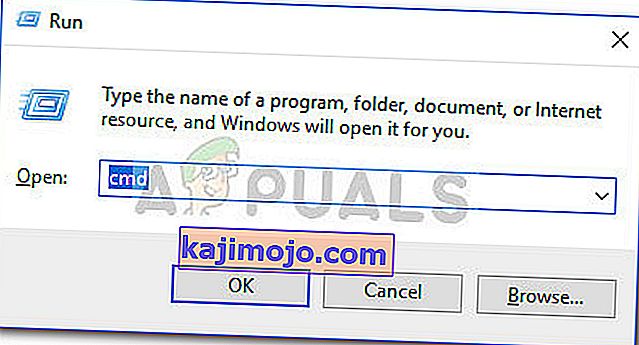
- Press “Windows” + “R” to open the Run prompt.
- Type in “cmd” and then press “Shift” + “Ctrl” + “Enter” to launch the command prompt with admin privileges.
- Type in the following commands one by one and press “Enter” after each to successfully run an SFC scan and a DISM Scan on your computer.
DISM /Online /Cleanup-Image /RestoreHealth sfc /scannow
- Restart your computer completely once these scans are completed.
- Check to see if by performing these scans, you were able to fix this issue on your computer.

Method 12: Run Windows Startup Repair
Startup Repair is capable of diagnosing and fixing the found issues. For example, it can automatically scan system files, registry settings, configuration settings, etc. and try to fix the problem on its own. Startup Repair is especially useful when your computer is unbootable. Since your computer fails to boot, Windows can boot into WinRE automatically. While, if it doesn’t appear, you can interrupt the boot process three times in a row, and then the WinRE screen appears. Alternatively, if you have a bootable USB medium, you can also set your computer to boot from it and go to Repair your computer to enter WinRE.
After you have successfully booted into the Windows Recovery Environment, click on the “Troubleshoot” option, and from there, select the “Advanced Options” screen. Inside the advanced options, select the “StartupRepair” button to successfully initiate the Startup Repairing process. Windows will begin to diagnose your computer automatically. When the process ends, your computer will restart automatically. You can wait to see whether it can boot successfully.

Megkerülő megoldás: Mielőtt a parancssorba vagy az Indításjavításba ugrana, ellenőrizze, hogy nincs-e további eszköz csatlakoztatva. A legjobb, ha megpróbálkozik egy másik újraindítással, a lehető legkevesebb eszközzel és külső meghajtóval a számítógéphez csatlakoztatva. Ez biztosítja, hogy a számítógéphez nemrég hozzáadott semmi sem okozza ezt a problémát. A legjobb, ha kihúzza a legújabb USB-meghajtókat, CD-ket, DVD-ket stb. Ez magában foglalja a memóriakártya-olvasót is. Győződjön meg arról, hogy minden külső meghajtót és USB-kulcsot vagy USB-meghajtót leválasztott, majd próbálkozzon újra.