Ez egy nagyon gyakori probléma, amelyre a Steam Bootstrapper szolgáltatása nem válaszol. Ez nem teszi lehetővé a Steam indítását, mert a Bootstrapper az első szolgáltatás, amely a Steam indításához szükséges. Ha nem hajtja végre, akkor a Steam sem. Sokan kérdezték tőlünk, hogy mi az oka a véletlenszerű viselkedésnek. Dióhéjban nincs konkrét oka annak, hogy miért nem válaszolhat. Ez azért van, mert mindegyikőtöknek különböző hardvere és konfigurációja van. Az összes megoldást felsoroltuk a leghatékonyabb és legkönnyebb megoldásoktól kezdve. Kezdje az elejétől, és haladjon lefelé.

Javítsa meg a sérült rendszerfájlokat
Töltse le és futtassa a Restorót a sérült fájlok kereséséhez innen , ha a fájlok sérültnek bizonyulnak és hiányoznak, javítsa meg őket, majd ellenőrizze, hogy a probléma megoldódott-e, ha nem folytatja az alább felsorolt megoldásokkal.
1. megoldás: Az Xbox 360 vezérlő leválasztása és a béta letiltása
Úgy tűnt, hogy van egy hiba a Steam bétájában és az Xbox 360 (sőt PS4) vezérlőjében. A megoldás meglehetősen egyszerű. Először le kell választania a vezérlőket, és miután kikapcsolta a béta verziót, indítsa újra a Steamet. Kövesse az alábbi lépéseket:
- A Windows + R gomb megnyomásával nyissa meg a Futtatás alkalmazást. A párbeszédpanelen írja be a „ taskmgr ” szót . Ez egy parancs a Feladatkezelő megjelenítésére, függetlenül a használt Windows verziójától.

- Keressen különböző futó Steam folyamatokat, és zárja le őket egyenként. Ne hagyj magad mögött semmit. Ez biztosítja, hogy az általunk végrehajtott változtatások konkrétak maradjanak, és mentésre kerüljenek, így az ügyfél újraindításakor nem jelennek meg hibák.

- Miután lezárta az összes folyamatot, válassza le a vezérlőt a portról, és zárja be az összes nyitott alkalmazást, amely a vezérlő hardverét kezeli. Frissítse a képernyőt, és folytassa a következő lépéssel a Steam béta kikapcsolásához.
- Ami a bétáról való lemondást jelenti, az a frissítésektől való lemondás, amíg azok hivatalosan nem indulnak el. A béta fázisnak vannak előnyei és hátrányai is. Meg kell próbálni az új változásokat, mielőtt néhány hónappal később megjelennek; másrészt a frissítések továbbra is hibásak lehetnek, és váratlan problémákat okozhatnak. Ebben az esetben egy vezérlő csatlakoztatása a Steam összeomlását okozza. Nyissa meg a Steam klienst, és a bal felső sarokban megjelenik egy „ Steam ” nevű opció . Kattintson rá, és keresse meg a beállításokat.

- Amikor a beállításokban van, kattintson a „ Fiók ” nevű fülre . Itt láthatja a „ Béta részvétel ” nevű opciót . Gondoskodnunk kell arról, hogy kliense ne legyen része egyetlen béta fázisnak sem. Kattintson az opcióra, és megjelenik egy legördülő ablak, amely lehetővé teszi az opció kiválasztását.

- Válassza ki azt a beállítást, amely szerint „ NINCS - Kikapcsolás az összes béta programtól ”. Zárja be a Steam-et és egy nyitott feladatkezelőt az összes Steam-folyamat befejezéséhez. Indítsa újra a számítógépet, és nyissa meg újra a Steam programot. Ha az ügyfél részt vett egy béta programban, akkor telepít néhány frissítést, mielőtt újra játszhatna.
- Ha bármilyen probléma merül fel a béta kikapcsolása közben, akkor böngészhet a könyvtárába, és onnan törölheti a béta fájlokat. A steam mappa alapértelmezett helyének a „ C: \ Program Files (x86) \ Steam ” kell lennie . Nyomja meg a Win Win + R gombot. Ennek fel kell ugrania a Run alkalmazásra. A párbeszédpanelbe írja be: „ C: \ Program Files (x86) \ Steam ”.

Vagy ha egy másik könyvtárba telepítette a Steamet, akkor böngészhet az adott könyvtárba, és folytathatja az alább említett lépéseket.

- Keressen egy „ Csomagok ” nevű mappába, és törölje az összes bétával kezdődő fájlt . Zárja be az ablakot, és az ügyfél újbóli elindítása után kövesse a 4. lépésben említett módszert a béta letiltására.
2. megoldás: A letöltési gyorsítótár törlése
A letöltési gyorsítótár olyan elemeket tartalmaz, amelyek fájlokat frissítenek vagy adatokat töltenek le a Steamből. Ezt a mappát ideiglenes tárolóként használják, amíg a frissítéseket nem telepítik a könyvtárba. Számos olyan eset fordulhat elő, amikor a fájlok megsérülhetnek hálózati hiba vagy belső hiba miatt. Megpróbálhatjuk törölni a letöltési gyorsítótárat a Bootstrapper probléma kijavításához. A Steam újraindítása után újra letölti az általunk törölt fájlokat és frissíti azokat.
- Nyissa meg a Steam klienst, és keresse meg a Beállítások lehetőséget . Ez a bal felső menüben található.
- Keresse meg a Letöltések elemet a Beállítások panelen.
- Kattintson a Letöltés gyorsítótárának törlése elemre . Kattintson az OK gombra a választás megerősítéséhez, és egy idő után a Steam meg fogja kérni a bejelentkezési adatokat.

- Az újbóli bejelentkezés után a Steam a várt módon indul.
3. megoldás: Az ügyfél futtatása rendszergazdaként
Bármely működő szoftverhez két engedély szükséges; olvasni a meghajtóról és írni rá. A két művelet bármelyikének elmulasztása vagy megtagadása a Steam váratlan működését és összeomlását okozhatja. Ennélfogva előfordulhat, hogy a Steam nem rendelkezik bizonyos speciális jogosultságokkal, amelyek szükségesek az indításhoz, ezért a bootstrapper nem töltődik be. Megpróbálhatja a Steam futtatását is rendszergazdaként.
- A Windows + R gomb megnyomásával nyissa meg a Futtatás alkalmazást. A párbeszédpanelen írja be a „ taskmgr ” szót . Ez egy parancs a Feladatkezelő megjelenítésére, függetlenül a használt Windows verziójától.

- Keressen különböző futó Steam folyamatokat, és zárja le őket egyenként. Ne hagyj magad mögött semmit. Ez biztosítja, hogy az általunk végrehajtott változtatások konkrétak maradjanak, és mentésre kerüljenek, így az ügyfél újraindításakor nem jelennek meg hibák.
- Kattintson a jobb gombbal a Steam kliensre, és válassza a „ Futtatás rendszergazdaként ” lehetőséget. Ez megadja a Steam számára az összes szükséges engedélyt, és remélhetőleg a várt módon indul.

4. megoldás: A Cortana letiltása
Many users reported that disabling Microsoft’s digital assistant (Cortana) solved their issue. Cortana has administrator privileges and monitors your actions and gathers data so it can serve you well. In many cases, this can conflict with your software (in this case Steam) and cause unexpected errors.
Disabling Cortana isn’t as simple as it used to be. When Windows 10 was launched, you could easily disable Cortana by just a flip of an option. However, after the upgrades, Microsoft removed the option completely. However, there is still away. We can edit the registry after creating a system restore point in case anything goes wrong.
- Press Windows + R button to open the Run application. In the dialogue box type “regedit”. This is a command to bring up the Registry Editor in front of you. You may be asked to grant permission to run the program. If you are prompted, press Yes.
- Once you are in the Registry Editor, navigate to the following.
HKEY_LOCAL_MACHINE>Software>Policies>Microsoft>Windows>Windows Search
- Here is a twister; you might not find a folder named Windows Search. If so, you can create one by right-clicking on Windows and select the option New.

- When you are in the Windows Search, right-click on the blank space and select “DWORD (32 bit)” from the list of options.

- After selecting the option, a new listing will appear which will be ready to be named. You should name it “AllowCortana”. After you have named it, double click on it so we can ensure that the Value Data is labeled as “0”.

- That’s it. Close the Registry Editor, restart your computer. Cortana will be long gone and you can check to start Steam using “Run as administrator”.
If this solution doesn’t work and you want Cortana to come back, you can enter the Registry Editor the way described and delete the folder we just made. After restarting your PC, Cortana should be available again.
Solution 5: Disabling VPN programs
Steam support officially responded to the problem by stating that your VPN services can be the issue. They recently identified several categories of programs (which provided masking or VPN) to be incompatible with Steam.
We can give it a shot by disabling the VPN programs or temporarily uninstalling them and starting Steam again. Please make sure that they are uninstalled completely because if some remnants of the program are left, they might still interfere with Steam. Always remember that a full system boot is mandatory after the uninstallation of this software to ensure that the registry has been successfully updated.
If this still doesn’t work, we can try completely resetting your OS networking support. Please note that this should be done as a last resort (even if re-installing Steam doesn’t work which is mentioned in the later solutions). Come back to this part, if the last solution doesn’t work.
- Press Windows + R button to open the Run application. In the dialogue box type “cmd”. This is a command to bring up the Command prompt.

- Type and hit enter.
netsh winsock reset catalog
- If the command was successful you should be receiving a message which says “Successfully reset the Winsock Catalog”.

- Restart your computer so that all effects take place and relaunch the Steam client using the option “Run as administrator”.
Solution 6: Checking if Steam is running in compatibility mode
We can check if your Steam is running in compatibility mode. In some cases, Steam runs incompatibility after sensing your operating system. The main role of a compatibility mode is to help older programs run in newer versions of Windows. Windows pretends (towards that app) that it is an older version so the application can run more smoothly and efficiently. However, this may prove to be a problem sometimes when Steam itself has moved on from the previous version to the newer one but the settings are still enabled.
- Press ⊞ Win + R button. This should pop-up the Run application. In the dialogue box write “C:\Program Files (x86)\Steam”.
Or if you installed Steam in another directory, you can browse to that directory and you can proceed with steps mentioned below.
- Once in the Steam directory, look for the Steam client’s shortcut “Steam.exe”. Right-click it and select Properties.
- Select the Compatibility tab and ensure that Compatibility mode is turned off. If it is checked, uncheck it and save changes before exiting.

- Launch Steam using administrative privileges and the problem should be resolved.
Solution 7: Adding Steam to your antivirus exceptions
Steam has a history to get flagged by anti-virus programs and get blacklisted. The client may not be able to perform regularly if it isn’t added to the exceptions list. Steam doesn’t harm your computer in any way; even if it does get flagged you have nothing to worry about it exploiting your computer in any way.
We have listed a number of ways to add steam as an exception to antivirus software. If you don’t find your desired antivirus below, you can always head over to its official site and follow the instructions.
McAfee Antivirus:
McAfee has no way to exclude certain files from its real-time scanning. The only way is to disable the antivirus entirely until the game is updated. To do this, open McAfree and select “Virus and Spyware Protection”. Here you find the option of “Real-Time Scanning”. Click that option and turn it off.

Then follow the following instruction to verify the integrity of game files.
- Restart your computer and relaunch Steam.
- Head over to the library section and right-click on the game which is giving you problems.
- Click on its properties and select the local files tab.
- Click the verify integrity of the game files button and Steam will verify that game in a few minutes.
Hopefully, after performing the above steps, your Steam won’t give any issue.

ESET NOD32
NOD32 has the tendency to mark some application files as malicious and will most probably quarantine it. This often results in the error while updating a game. Browse to your current Steam directory and copy the address
- The default location for your steam folder should be “C:\Program Files (x86)\Steam”. Press ⊞ Win + R button. This should pop-up the Run application. In the dialogue box write “C:\Program Files (x86)\Steam”.
Or if you installed Steam in another directory, you can browse to that directory and you can proceed with steps mentioned below.
After copying the address open ESET NOD32 and paste the location in “exclude from real-time scanning“.
Follow the ‘verify integrity of game files’ method listed above and you will be all good.

Kaspersky AV
Kaspersky may sometimes flag Steam as an intruder and disable it from making any changes to the hard drive. To fix this, head over to ‘threats and exclusions’. Navigate to ‘trusted zone’ and add Steam.exe as a trusted application. Remember to change the settings to Do not restrict application activity as well as Do not scan opened files.
Follow the ‘verify integrity of game files’ method listed above and restart your computer.

Solution 8: Refreshing Steam files
If all the mentioned solutions don’t work, it means that there is a bad file in your Steam’s operating files. We have no specific way to pinpoint the exact files that are giving us trouble. The most we can do is check the logs for any errors that Steam generated.
- Lépjen ki a Steamből, és keresse meg a Steam könyvtárat (C: / Program Files (x86) / Steam). Ha egyéni helyet választott a telepítéshez, navigáljon oda.
- Lépjen a ' logs ' mappába, és nyissa meg a ' txt ' mappát .
- Ugrás a szövegfájl aljára, és keresse meg a legutóbbi hibákat.
A hibára példa:
[2017-04-12 12:47:31] [AppID 346110] A frissítés törölve: A fájl végrehajtása sikertelen: Nem sikerült megváltoztatni a „C: \ Program Files (x86) \ Steam \ steamapps \ workshop \ content \ 346110 \ 570371714 \ változatlan fájlt LinuxNoEditor \ NPC \ Female \ Assets \ Nude \ Nude_Human_Female_Body_D.uasset.z.uncompressed_size "(Lemezírás hiba)The number written first in the URL is your APPID, in this case (346110) is the AppID for ARK Survival Evolved.
- Navigate to the root folder of the mod, in this case, it is 570371714. It has no specific file size as the root folders of different games may vary. Delete the file.
- Restart steam and move to the download folder. Here you will notice that Steam will be asking for an update for the game. Update the necessary files and you’ll be good to go.
- If you can’t extract any information from the logs, you can proceed with the refreshing of Steam files. The default location for your steam folder should be “C:\Program Files (x86)\Steam”. Press ⊞ the Win + R button. This should pop-up the Run application. In the dialogue box write “C:\Program Files (x86)\Steam”.
Or if you installed Steam in another directory, you can browse to that directory and you can proceed with steps mentioned below.
- Locate the following folders:
- Steam.exe (Application)
- SteamApps (Folder)
- Delete all the other files/folders/applications except the ones mentioned above and restart Steam.
- Now Steam will download all the missing files and folders and launch when it’s ready. It is advised that you restart your computer before launching Steam again with the “Run as administrator option”.
Solution 9: Perform Clean Startup
In some cases, a clean reinitialized startup of the computer might get rid fo this issue on your computer and if you think you have already tried this, you might be wrong. Some computers are configured in such a way that they turn off completely but some of the launch data is written to the RAM and this prevents a complete reinitialization of the computer.
Therefore, in this step, we will first be configuring your computer to perform a clean startup and after that, we will be checking to see if performing one actually fixes this issue with Steam. For that:
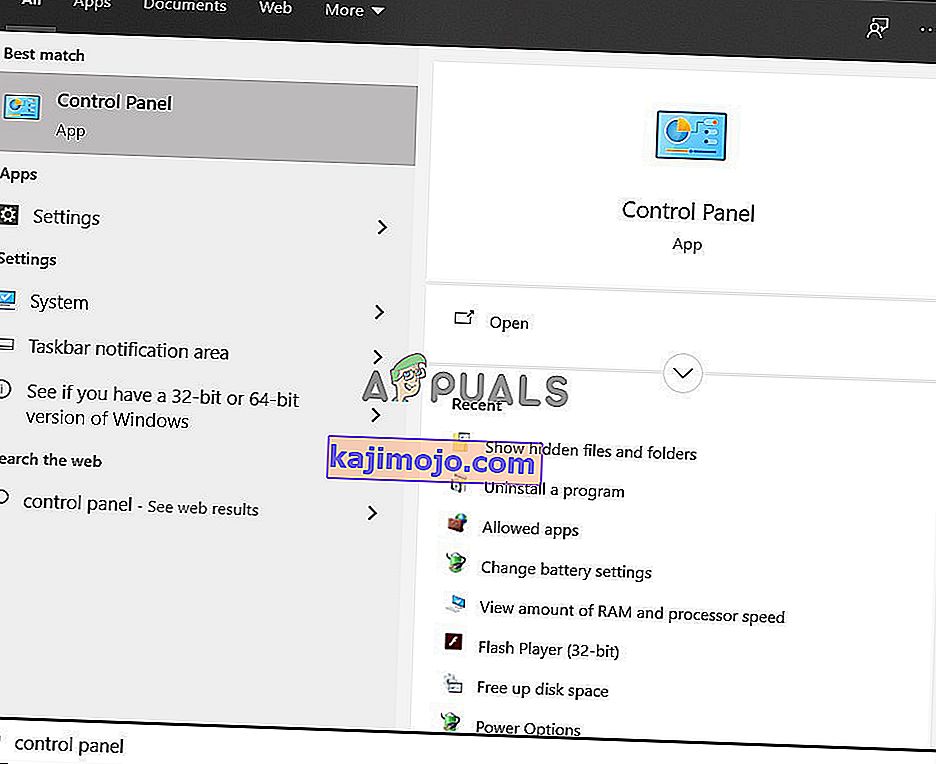
- Press “Windows” + “R” to open the Run prompt.
- Type in “Control Panel” and press “enter” to launch the classical Control Panel interface.
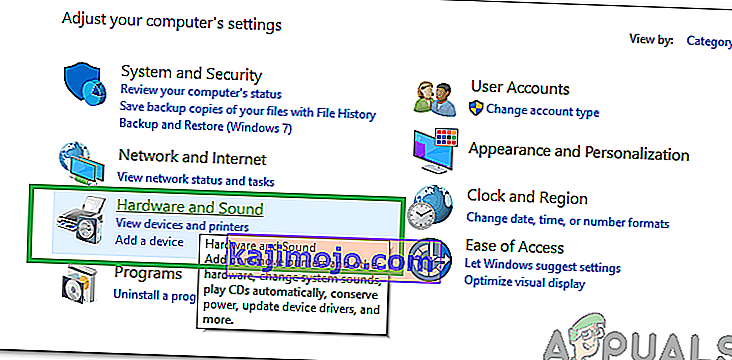
- Inside the control panel, click on the “Hardware and Sound” option and then select the “Power Options” button.
- Inside the power options, click on the “Choose what the power button does” from the left side.
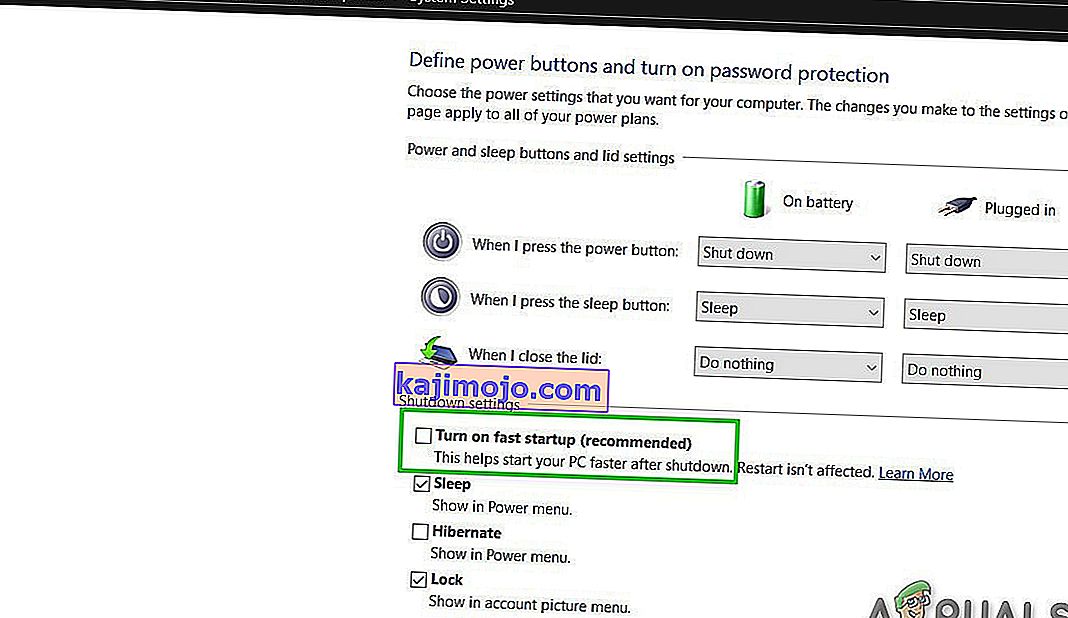
- Click on the “Change Settings” option if the fast startup option is greyed out.
- Make sure to uncheck the “Turn on Fast Startup” option and save your changes.
- Closeout of the window and terminate any unnecessary applications.
- Click on the “Start Menu”, click on the “Power Options” and select “Shutdown” from the list.
- This option should completely power down your computer and after performing a complete shutdown, wait for some minutes before turning your computer back on.
- After the computer turns back on, check to see if the Steam Client Bootstrapper actually responds.


Method 10: Disable Antivirus Program
In some cases, allowing the client through the Antivirus might not help you in overcoming this issue on your computer and it still might be preventing some functions of the Steam client from running properly. Therefore, it is recommended that you try to temporarily disable your Antivirus program completely and then try to run the Steam Client. If the client runs fine, it means that the issue lies with the Antivirus and you can move on towards trying to fix the Antivirus instead of Steam.
Method 11: Update GPU Drivers.
Another issue that some people encountered while trying to run the Steam client is that it sometimes tries to use the GPU resources during the launching process and if your drivers aren’t properly configured to allow this use, the error message is displayed. Therefore, in this step, we will be attempting to update the GPU drivers and in doing so, we should be able to fix this issue. For that:
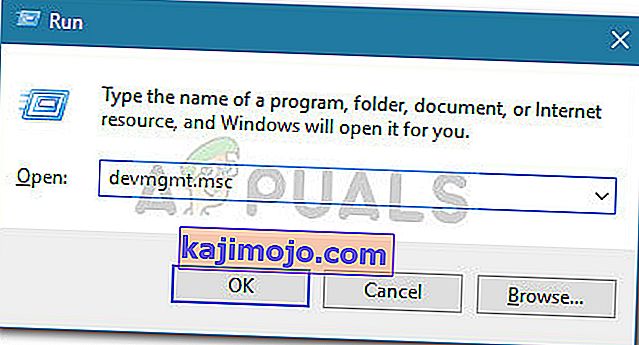
- Press “Windows” + “R’ to open the Run prompt.
- Type in “Devmgmt.msc” and press “Enter” to launch the device manager.
- Inside the Device Manager, double click on the “Display Adapters” option to expand it and then right-click on the GPU drivers being used by the computer.
- Click on the “Update Driver” option and then select the “Search automatically for Updated Driver Software” button.
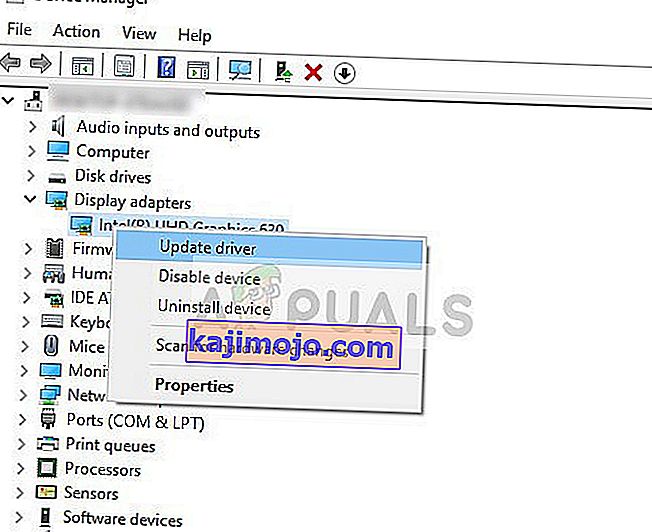
- Wait for this window to automatically search for any missing drivers and then automatically installs them on your computer.
- Follow through with the on-screen instructions to ensure that these drivers are installed on your computer.
- Check to see if installing the drivers gets rid of this issue on your computer.


Method 12: Reset TCP/IP
The command that we will be using in this method is commonly used to reset the TCP/IP connection. TCP/IP stands for transmission control protocol/Internet Protocol, it is a type of protocol used to communicate with other computers. If TCP/IP setting on your computer has been glitched or bugged, even though you might be able to ping a computer on your network, you won’t be able to pull some webpages correctly and your internet will work for some addresses while for others, it won’t be able to work properly.
Furthermore, we will also be resetting the Winsock to recover the computer from any socket errors that can arise if you have been downloading suspicious or unverified files on your computer or if you have run a malicious script or even if you have been surfing unsecured websites.
Winsock issues are a common example of the number of things that can go wrong on a Windows computer with the network and in this step, we will be executing a couple of commands from your command prompt to fix these issues, however, keep in mind that none of these should damage any file that isn’t automatically regenerated by the computer so you don’t need to worry about losing any files.
- Press the “Windows” + “R” buttons on your keyboard to launch the Run prompt.
- Inside the Run prompt, Type in “Cmd” and press “Shift” + “Ctrl” + “Enter” to launch the command prompt with admin permissions.

- After launching the command prompt, type in the following commands one by one to execute them on your computer.
netsh winsock reset catalog netsh int ip reset reset.log hit ipconfig / release ipconfig / renew
- After the commands have been executed on your computer, exit out of the command prompt and check to see if the issue still persists.

Method 13: Install Steam On A Different Hard Drive
Sometimes the drive that Steam installs itself on may be affected by file corruption, or may not have enough room for the various updates that Steam requires now and then. In fact, there are a bunch of issues that may be related to the drive on which Steam is stored. If the option is available to you, changing the drive where Steam is located could solve the Steam Client problem. This process is similar to that of reinstalling, except obviously this time you’re changing the desired location before you re-download Steam. Before starting, remember to back up your files in case anything goes wrong.
- Log out and exit Steam.
- Find the folder where Steam is installed, if it’s the default you should find it at: C:\Program Files\Steam.
- Similar to the reinstalling process, delete all Steam files and folders except SteamApps and exe.
- Cut and paste the Steam folder to the new location you have selected.

- Launch Steam and the executable should automatically recognize that your client is missing some important files.
- It will automatically download and replace these missing files on your computer and after this process, the Steam client should be installed again.
- Check to see if launching the client this time fixes the issue.

Method 14: Update the Date And Time Settings
Date and Time settings on your computer are used by the network services verify a server’s security certificate. If the date and time settings have been configured incorrectly, the security certificate of the server might appear to the network services as suspicious and they might not allow the computer to connect to that server. Therefore, in this step, we will be updating the Date and Time Settings. For that:
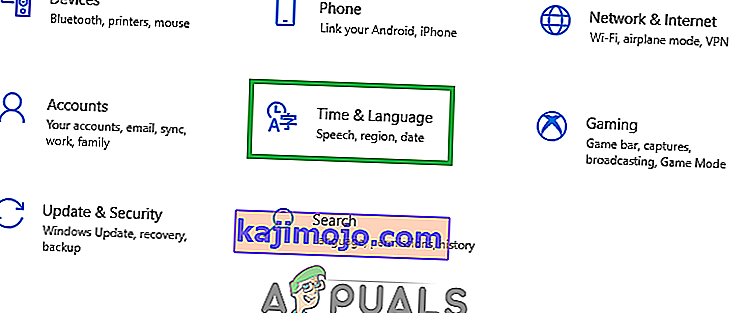
- Press “Windows” + “I” to open the settings and click on the “Time and Language” button to open the Date and time settings.
- From the next window, choose the “Date& time” tab and scroll down and click on the “Add clocks for different time zones” option from the right pane.
- In the pop-up window, switch to the Internet Time tab and click on the “Change settings” option.
- In the Internet Time Settings window, check the “Synchronize with an Internet time server” option, and from the next screen, choose a internet server.
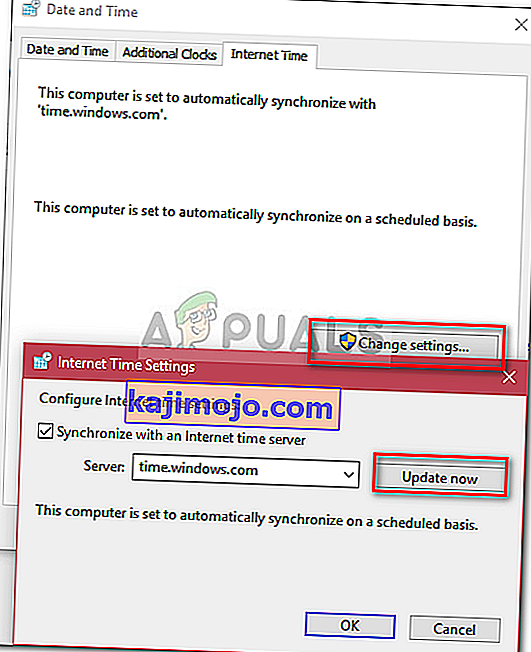
- From the next window, click on the “Update Now” button and close out fo the Window.
- Check to see if doing this fixes the issue with the Steam client.


Method 15: Refresh Client Registry
Steam’s registry is prone to the occasional hiccup where it gets stuck in a loop preventing the client from fully loading. This options, however, is only available for some users so make sure to check if the file is actually available in your Steam Client folder before following through with the instructions. In order to refresh the Client Registry:
- Press “Windows” + “R” to open the Run prompt.
- Type in “Taskmgr” and press “Enter” to launch the task manager.

- Inside the task manager, click on the “Processes” tab and make sure to end all currently running Steam processes.

- Press “Windows” + “E” to open up the explorer window and from here, navigate to the location where you actually installed Steam in the first place.
Note: C:\Program Files (x86)\Steam\ in most cases or the one you specified when Steam was installed.
- In the Steam directory, find the file named ClientRegistry.blob and change the name to something else.
- After changing the name of this file, launch the Steam client and it should automatically generate a new file for your installation.
- Check to see if generating this new file helps you to fix this issue on your computer.


Method 16: Check File System For Your HardDrive
In some cases, if the harddrive’s file system has been rendered corrupted or mismanaged, you might be unable to properly launch the Steam client because its launching process will be halted due to a mismanaged file system due to which it won’t be able to properly retrieve its files.
Apart from the Windows built-in tool, you are recommended to use a professional third-party utility MiniTool Partition Wizard. As a reliable partition manager, this utility provides a feature of Check File System to help you check and repair your hard drive errors. This seems a bit more convenient than using the default tool so we recommend you try this out.
- Launch your favorite browser and click here to download MiniTool Partition Wizard.
- After the download is finished, click on the downloaded executable and follow through with the on-screen instructions to install it on your computer.
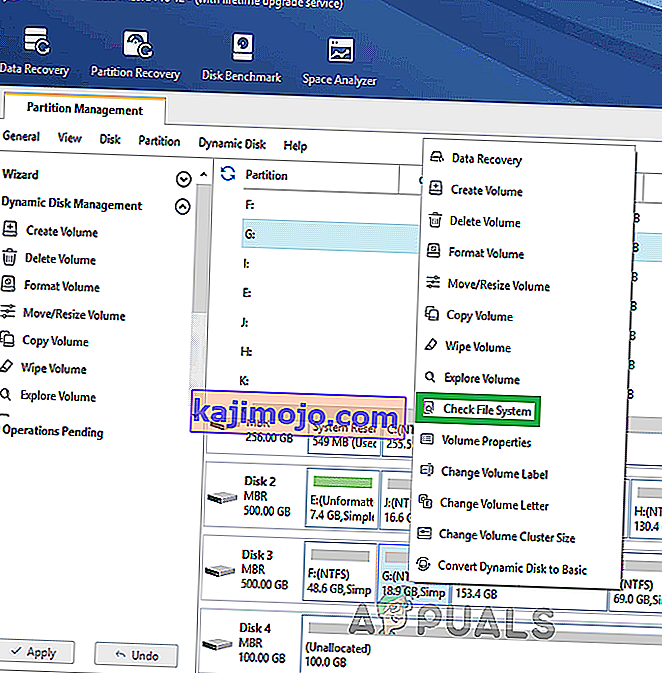
- Launch the program to get its main interface and Right-click the partition where your Steam application is installed and choose the “Check File System” option from the pop-up menu. You can also choose the “Check File System” button from the Check Partition section in the left pane.
- If the selected partition is your system drive, you will be prompted to schedule the partition to be checked next time your restart the system and you should click “Yes” and restart your computer to start checking the drive.
- Once you restart your computer, the checking process will begin and you will be prompted to either allow it or skip it.
- Allow this process and let your File System be sorted out automatically.
- Check to see if by sorting the File System, you are able to fix this issue on your computer.

Method 17: Delete a Config File
In some cases, it is possible that a certain config file for Steam might’ve been corrupted or you might’ve selected some incorrect configurations on your Steam client due to which you are running into this error. Luckily, we can easily remove this file from the computer and Steam should generate it automatically without the loss of any data. However, you might see a reset in some preferences that you might’ve set. In order to do this:
- Press the “Windows” + “E” buttons to open the File Explorer.
- From here, navigate to the following location.
Steam\userdata\NAMEFILE\config
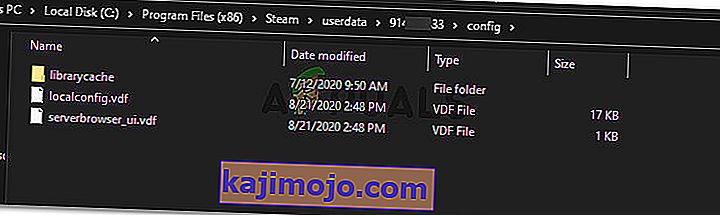
- There should be a localconfig.vdf file present inside this folder to it might be replaced with your username or a random number but it will most certainly be a “.cfg” file located inside this folder.
- Right-click on this file and select the “Delete” option to remove it from your computer.
- Launch Steam again and check to see if the issue still persists.

Workaround: Finally, if you’re still struggling to get Steam up and running, there’s a wide community you can go to for help. They have message boards that are worth looking at, as you may find someone has already asked a similar query and received helpful advice. If that’s unsuccessful, you can then post your own question on the forum and wait for responses. Chances are, with the number of gamers Steam attracts, plenty of people have had similar experiences. Of course, there’s also the general support section on the Steam website that could be of use. They have a fairly thorough list of help topics that range from gaming issues to problems signing in.